
Newsletter 12
First Impressions
|
I like to think of myself as someone who thinks outside of the square…sometimes.
I like to encourage burners who seek my advice to think of pyrography as not simply a hot pen that burns pictures, but to take their machines, their nibs, their hands, their minds and push their chosen medium in as many directions as they can. Doing this can be very freeing as well as a wonderful way to open doors of creative possibility that seemed previously shut.
When I was doing seminars at the Pennsylvania show I made 'variety' a theme of my demonstrations. I chose to show some of the ways that I've discovered pyrography can be used...as a stand-alone craft as well as in conjunction with other mediums. I really don't want people to be able to burn in my style…I like to teach techniques and possibilities that they can apply to their own work, their own subject matter… in their own style.
With this in mind, on the first day I was doing a little demonstration about how I use a cool, sturdy writing nib to dig into the timber surface, making impressions in the wood, and then using a hot shader to burn over these impressions. The surface burns black but the impressions remained unburnt. The reaction was a gasp from the audience as I burnt the surface black with broad sweeps of a shading nib, revealing the stark, previously unseen impressions. One of the students commented that it looked like stars in the sky and everyone enthusiastically agreed. (LOL…I still giggle when I remember that because we all went, 'Ohhhhhhh!…' as one… and then we all started laughing at ourselves because we were like cave people seeing fire for the first time.)
Because of the people's reaction in those seminars I thought we might cover impression in this issue of The Pyro News. I have used this technique in the past for various things, like white hair, etc, but its application is potentially much broader than that. I recently spent an afternoon playing with this technique so I could pass on some possibilities to the readers of The Pyro News.
These examples are by no means the limits of this technique. I came away from my experiments feeling that impressing has a lot more potential than I had expected. Its decorative applications especially, seemed pretty much endless. And how hard could it be? You jab something into the timber surface…that area is lowered in the pattern of the impressing tool…you burn over the top…the peaks (timber surface) catch, the valleys , (impressed depressions) remain unburnt and voila…fire!
Hopefully my little examples here will inspire some of you to experiment and push the boundaries of this technique…I think the possibilities are exciting! - Sue.
|


 |
 |
|
Branding iron punched into the surface, then burnt.
Any patterned tool can be used, leather working tools,
initial stamps etc.
|
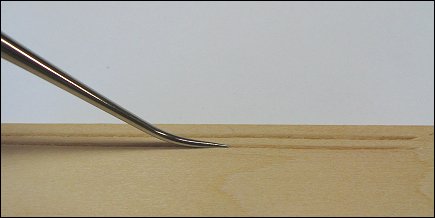
Impressed with a writing nib with just a bit of
heat to make it slip easily.
|
THE PROCESS
|
I used a small variety of tools to make these various impressions. Given enough tools and some experimentation, the patterns that could be made would be virtually limitless. I was thinking that leather embossing tools would be excellent for more fancy/repetitive patterns and initial branding stamps could be used to stamp initials...this would be excellent for signing your name on dark projects.
|
|
There's no need for pyrographers to search height and low for tools, your basic burning nibs can be used to great effect in this technique. I have found that it's better to have a little bit of heat on when impressing the wood...just enough to help the nib slip along more easily, but not enough to darken the impressed area too much. One word of caution here: make sure your nib can stand up to the added pressure, fine nibs are likely to break or bend.
|
 |
 |
|
Impressing into the wood with a writing nib.
Impress the trench in a series of strokes...
trying to impress all at once will more likely tear the wood.
|
Use a shading nib to burn over the impressed area.
Use a light pressure when burning, so you don't sink into the impressed valleys.
Think about burning different tones of darkness over the impressed area, not just black.
|
|
I used basswood to impress into. This had its positives and negatives. One plus is that it's soft and didn't cause much resistance to my 'hand tooling' the surface. The negative is that heavy pressure will tear the wood, so experimentation will be needed to find a happy medium of enough pressure to indent and not so heavy as to tear. Even though heavier timbers would be more difficult to hand impress, I think they would be more suitable to impress with hammer pressure. The dense fibers of heavy timber would be less likely to tear and the 'branded' edge would appear more crisp.
|
 |
 |
|
Here, I've impressed the wood with a phillips head.
I've then lightly burnt over the top with a shading nib.
|
I have then impressed again into the lightly burnt wood...
and then burnt again...this time dark.
The result is multi-coloured impressions.
Consider burning several tones instead of just two.
|
|
Consider how difficult it is to burn around small areas. Now, lets see how we can use this technique to put a decorative edge around your work...or around its frame.
|
 |
 |
|
Here, I'm impressing the wood with a dental pick.
Once again, I impressed the trench with several sweeps...
gradually getting lower with each sweep.
I used a ruler as a guide when impressing the first few sweeps.
|
I then used a shader to burn over the impressions.
I tended to burn slightly across the impressions to keep the lines crisp.
|
 |
 |
|
I then used a fine engraving burr to clean the trenches.
You could also use folded sandpaper.
|
The finished result is a crisp, decorative edge.
This reminds me of 'V' grooves on picture matting.
|
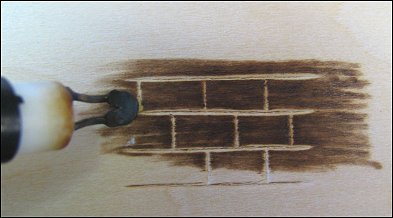 Bricks made easy.
I decided to see if this method would be effective in
depicting the mortar between bricks....it worked great!
Imagine burning a complex brick building using this method...
|
 |
 |
|
I used a ruler and a pointy implement to
impress these dots along the edge.
You could use this in conjunction with a straight line...or in any other combination you choose.
|
A 'pouncing wheel' could be used to accomplish this
task more quickly.
|
SIMPLE, BUT FUN
|
Finishing with the theme of a starry night, I decided to end my experiments with a tiny freehand burning. It occurred to me that you could burn a dark silhouette against a starry sky using this technique, so, I burnt this little barn and silo against a night sky.
The possibilities of silhouettes against a sky or window etc, seem broad to me. A buggy cresting a hill on a starry night...trees against the night sky...owls...wolf howling...hey...I just thought...you could even do fireflies!
|
 |
 |
|
Impress in a random manner.
I used 3 sizes of mini phillips head screwdrivers to do this.
|
I started colouring the sky, then decided to burn in my barn.
|
 |
 |
|
I used a writing nib to burn the dark/solid silhouette.
|
I finished colouring in the sky using a shading nib.
I lightened the sky as it approached the horizon.
|
|
|