
Newsletter 15
 |
 |
|
Recently I traveled to South Dakota where I took about a trillion photos, (give or take a billion), for my reference collection. Here, in Custer National Park, I'm taking a photo of a male Prong Horn.
|
The resulting photo was used to burn a sketch on paper. (No colour was added.) The sepia effect, that burning on paper gives, lends itself beautifully to natural subjects.
|
|
Colour can also be easily combined with the burning to bring a further dimension to an intended subject. Water colour can be added in a thin wash to colour a subject subtly or it can be added thickly to create a vibrant, folk art feel. When creating a folk art project using a combination of pyrography and paint, we gain one distinct advantage; a burnt surface is a natural barrier to liquids, IE, water based pigments find it difficult to penetrate a scorched area. This means, if you outline the shapes of your project with a burnt line, it will create a moat that is difficult for pigment to cross over...making it super easy to paint up to the edges with less fear of sloppy run over. You'll see in our card project that this is the method I've used to outline the various shapes of my design. Once these outlines were burnt I then easily began filling in the different coloured areas with acrylic paint. Certainly you could also use gouache, poster paint, inks, water colour and various other paints.

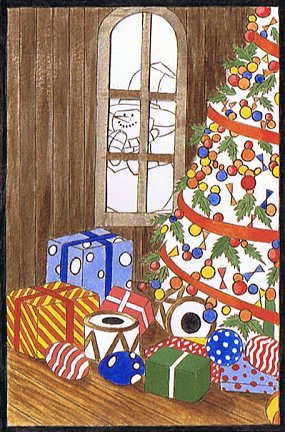
The finished card project. The snowman, inside, is seen through a cutout window on the front of the card.
This card was a lot of fun to produce....time consuming, yes, but a perfect and unique gift for that special someone. If you find this particular project a little too complex, hit the internet, old cards or calendars etc and find a more simple project to tackle. The basic technique will still be the same as you see here, but with your own design. A more simple design, such as a bell and ribbon would take far less time to complete and quite a few of these could be produced for your loved ones. Or...as an alternative, how about burning some cute little gift cards... or perhaps place cards for the Christmas table? Paper burning isn't limited to cards...the potential is enormous, the paper plentiful and the results pleasing. It does take a little practice to burn neatly on paper. Contrary to some belief, it's difficult to burn holes in the paper if the nib is kept in motion, but paper does have more drag than wood and it does have the tendency to suck a lot of heat away from the nib...but, with practice you'll get the feel of it...and who cares if you ruin a few practice pieces in the process...it's only paper after all! Enjoy the project:)
Reference 1: The 'Merry Christmas' font intended for the inside of the card. I formed this text by using WordArt in Microsoft Word. Many other text or imaging programs will produce a similar result. .
.

Reference 3: I wanted to show how a skew can be used to cut paper, so I decided on a scene that had a window that could be cut out, revealing the image inside the card, but outside the house...if you know what I mean. In this case, I chose a snowman as my subject.
.
 Step 1: Make the basis of your card by folding a piece of cardboard in half. I used an old Christmas card as a template. Thick water colour paper is the best bet. Hot pressed is preferred because it has a smooth surface to burn on. Cold pressed can be used but it does have varying degrees of texture.
.
 Step 2: Place the pattern on top of the surface to be decorated. You can use some 'magic' tape to hold it in place but only apply very lightly or you'll tear the cardboard on removal. Slide graphite paper between the pattern and the surface of the paper.
.
 Step 3: Use a red pen to trace the pattern. I find a red pen helps me keep a track of where I've been. Before going too far check that the graphite paper is up the right way. You may also want to check on some scrap paper to see how dark or light your specific graphite paper is transferring.
.
 Step 4: I'm burning the straight and lazy curved lines with a skew. In this case I'm using my favourite style of skew, the Razertip HD14M. A skew is a knife like nib and it is designed to burn crisp/thin lines, perfect for edging this project. Make sure you have opened your card so you don't mistakenly scorch the opposite inside. Also, place a piece of scrap ply below your work to protect your table top.
.
 Step 5: While the middle of the curved skew blade is fine to use when burning longer lines, the toe of the skew is better suited for burning tiny lines, like those on the holly leaves.
.
 Step 6: The skew is awkward when burning tight curves, like these little circles. In this case I have switched to a 0.8mm ball pen (Razertip 99.008). The ball pen is one of the writing nib set. Being a round sphere, the ball nib is perfect for burning a circle without needing to lift the tip off the paper.
.
 Step 7: I didn't want the design to go right up to the card's edge. To tidy up I decide to add a black border to the card. This will also add a nice contrast to the colours. Simply rule a straight edge with a ruler and an HB pencil.
.
 Step 8: To burn a long, straight line it's better that you let your hand slide freely across the surface as you travel along. If you need to use a ruler you can, but keep in mind that placing a hot nib next to a metal ruler will suck all of the heat out of the nib and you won't be able to burn. (It will obviously burn a wooden ruler.) If you wish to use a ruler you can raise it higher than the surface by propping it on a couple of books etc. You can then use this as a guide to run the pen shaft along...not the nib.
.
 Step 9: This is a scan of the card front, burnt lines complete. We need to cut out the windows next, so we can see where to place our snowman.
.
 Step 10: Here, I'm using a heavy duty 14M skew to cut out the panes of the window. You could certainly use any of the skews to do this. (A 'skew' is a knife like/scalpel like nib.) If your skew is a little blunt you may need to gently hone it on a strop or other gentle abrasive sharpening equipment. You might have to use a craft blade to cut out the panes if you use the larger set temperature/soldering iron type of burner. (The skew blades on these tend to be wider and bulkier than wire nib skews.) Obviously, make sure that the card isn't folded while doing this or you will cut the inside of the card. Scrap wood or cardboard backing can be placed behind to cushion the cutting process.
.
 Step 11: To cut through my cardboard I needed to turn my skew heat up a fraction from when I was burning the lines, but not brutally so. I didn't try to cut all the way through in one go, instead I used 2 or 3 sweeps. Any parts of the pane that don't give way can be severed with a craft blade from behind
.
 Step 12: A close up scan of the cut out windows. You could certainly cut out the window panes entirely with a craft blade, but I personally like the rustic appeal of the burnt cutouts. Once the window panes are cut out you can now position your snowman pattern for best visibility. Trace the snowman pattern and burn the outlines.
.
 Step 13: Now it's time to position the 'Merry Christmas' pattern...place this wherever you wish. Trace the pattern onto the card by using graphite paper.
.
 Step 14: It would be difficult to edge the lettering with a skew because it has some very tight curves, so I chose to edge my lettering with a writing nib. (Remember, the writing nib is the one with a smooth rounded end. It can be moved in any direction without needing to lift the nib from the surface being burnt.) In this case I'm using a 1.5mm ball nib, (Razertip 99.015). First I edge the letters and then fill them in with the same nib. Don't worry, you won't punch through the cardboard as long as you keep the nib in motion. (Practice on some scrap.) I filled my lettering in using a constant circular motion.
.
 Step 15: We have the inside of the card burnt and ready for some colour. If you've created a little soot during the burning stage it might be a good idea to use a dry household paint brush to gently dust away any excess grit before proceeding with the painting.
.
 Step 16: As I've mentioned before, the beauty of edging a folk art painting with pyrography is that the burnt line tends to reject liquids. Here I'm starting to colour in the various areas. As long as my brush isn't too heavily loaded with paint I can fill in the areas, even the tiny ones, quickly and easily. (Too much paint can inundate your burnt moat line and spill over into the neighbouring area.) I personally love acrylic paints, but you can use many other kinds of paints: gouache, poster/folk art paints, water colour, ink etc etc. (Jo Sonja paints are cheap and would do just fine for this project. You could even use pencil but the pigment does tend to get caught in the texture of the burning and it can look a little mucky.
.
 Step 17: This is just an interim scan to show you the painting process part way through. I didn't find it necessary to paint the white areas with white paint...I simply left them untouched, allowing the white cardboard to remain seen
.
 Step 18: This scan shows my painting after all of the colour has been added. You'll note I opted not to paint thousands of tiny leaf needles on the tree, (I'm not that silly), instead I decided to colour the tree in a deep green. The deepness of the green lets the decorations and other leaves stand out. (Add a touch of black to your green if it's not deep enough.) I then added the lights by dotting white all over.
.
 Step 19: You could stop at the previous step and the card would look very effective, but to add a little more 3D realism I decided to add a little bit of shadow to the presents. (I've already added the shadow to the floor. To do this I used a light wash of Burnt Sienna. The same colour that was used on the wood grain.) There's a lot of theory about how you should paint shadow, but lets face it, this is a Christmas card and near enough is good enough...so I just mixed a touch of black to a lot of water. I then painted this thin wash over the base of the balls and to the sides of the presents facing away from the window. You'll see through the window that the roundness of the Snowman was also accented by a quick stroke of this heavily diluted wash
.
 Step 20: Here is a close up of our little Snowman. Nothing fancy, but a nice 'something' to see through the window and a little decoration for the inside of the card.
.
 Step 21: One last word on this project: You may find a ghost image of the burning you've done, on the reverse side of the cardboard. You might also find that the paint has buckled your cardboard a bit. If either of these things has happened you might like to glue a fresh sheet of paper or cardboard on the ghost side of the card. You can use a spray contact adhesive to do this. You will, however, need to cut out your window panes again...with a craft knife. (We don't want to be burning through glue.)
.
Colour Chart
Don't feel you need to use as many colours as I have. A limited pallet would also look very nice...or think about mixing what paints you have to make new colours....you don't need to go to any extra expense to create this project. This is just an example of the colours I had on hand and decided to use. The beauty of this type of folk art burning is you can choose, pretty much, any colours you like. You can even incorporate little gift cards in your design and place them on certain presents, then paint the names of your loves ones on the cards!:) The possibilities are many!
I hope you have learnt something from this tutorial, but most of all I hope you find something fun and enjoyable to do.
Happy burning everyone...I'll see you all in the new year.
|


